High-rise building visualization is a notably technically demanding specializations in architectural rendering. The scale of a tower — anything from 10 to 80+ stories — creates perspective and framing challenges that don't exist with low-rise projects. The surrounding urban context is dense and complex. Planning submissions require photomontage composites showing the building integrated into actual photography of the site. Investor packages need to communicate the full development at multiple scales simultaneously: street experience, building form, upper-floor views, amenity spaces, and residential interiors.
In my experience working on tall building projects, the visualization brief is almost always underspecified when clients first reach out. They ask for "a few renders of the tower" without accounting for the number of distinct audiences — investors, lenders, planning boards, buyers — each needing fundamentally different imagery. Getting the view set right at the start, and understanding what each audience actually needs to see, determines whether the rendering package does useful work or just looks good on its own terms.
This guide covers how high-rise rendering differs from low-rise work, what a complete tower visualization package includes, the camera and perspective considerations unique to tall buildings, and what to budget for each phase.
Why High-Rise Rendering Is Technically Distinct
Three factors make tall building visualization categorically different from standard architectural rendering: vertical scale, urban context complexity, and multi-audience requirements.
Vertical scale means no single camera position captures the whole building effectively. A street-level camera looking up at a 40-story tower produces extreme perspective convergence — the base reads at a natural human scale but the upper floors appear compressed and distant. A camera pulled far enough back to show the whole building loses facade detail entirely. Professional high-rise rendering uses a suite of camera positions — each designed for a specific communicative purpose — rather than trying to show everything from one angle.
Urban context complexity means the surrounding environment is as demanding to model as the building itself. Downtown Los Angeles, Century City, Koreatown, and other dense neighborhoods have hundreds of neighboring buildings, streetscape elements, and contextual features that need to read accurately for planning submissions and investor materials. Cutting corners on the surrounding environment produces renders that look like isolated objects on a blank platform — technically impressive but unconvincing in context.
Multi-audience requirements mean that a tower project cannot be served by a single rendering type. Investors need aerial context and massing clarity. Planning boards need photomontage composites and street-level views from designated viewpoints. Buyers need upper-floor interior renders showing the city view that justifies the premium pricing. Each audience needs imagery designed specifically for what they're evaluating.
The Standard High-Rise View Set
A complete tower visualization package typically includes eight to twelve images covering four distinct visual registers. Here's how I structure the standard view set for a high-rise development:
Aerial context view (1–2 images). A bird's-eye view showing the building in its broader urban setting — surrounding blocks, transport connections, landmarks, and the building's relationship to skyline and waterfront where applicable. This view is the single most important image for investor presentations because it communicates the project's position in the city rather than just its individual form. Camera height is typically 200–400m above the site, depending on building height and how much context needs to be visible.
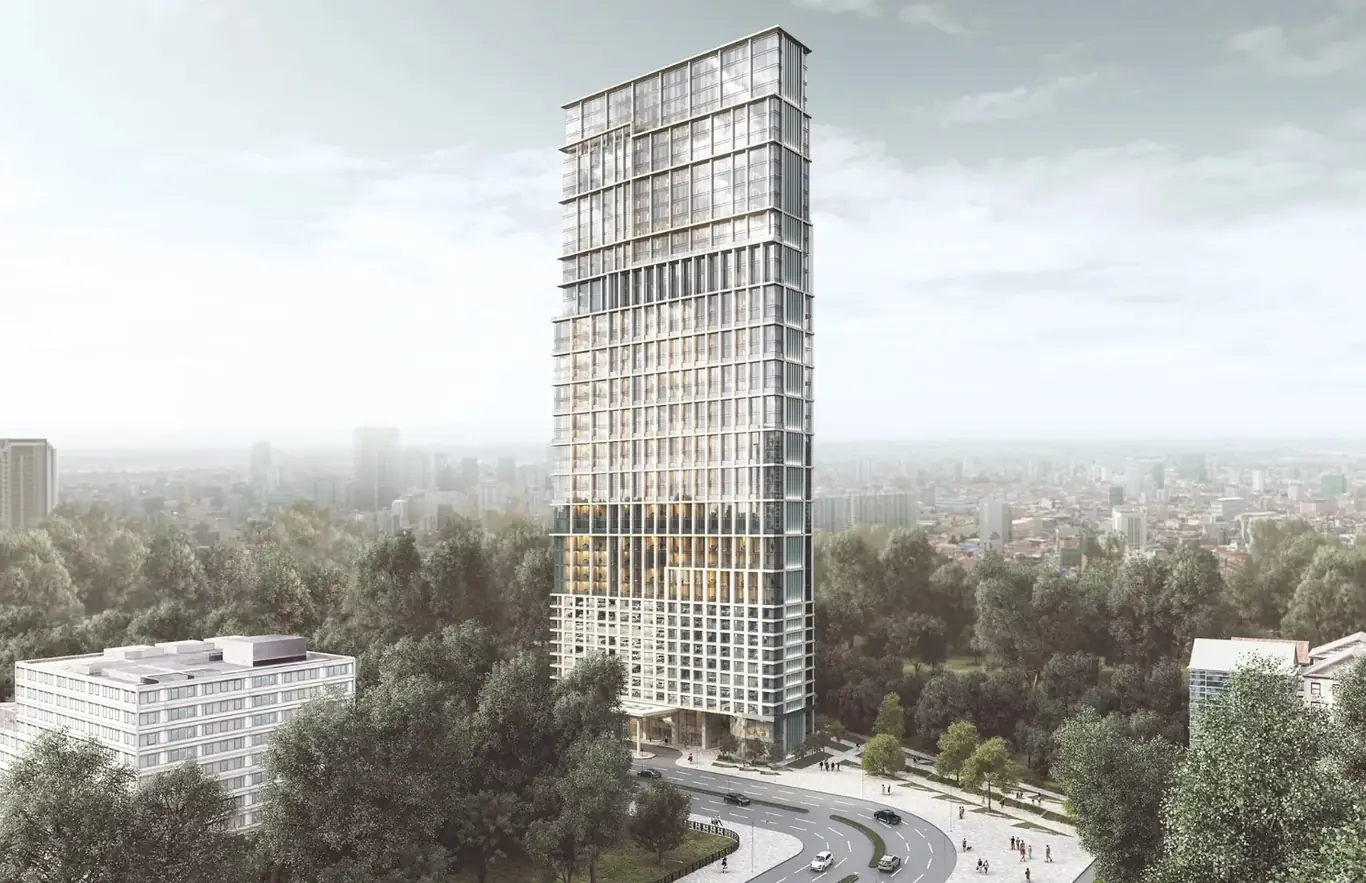
Facade hero views (2–3 images). Street-level or mid-elevation cameras showing the full building face. For a tower, this typically means one primary facade view from the widest accessible street or plaza, one view showing the ground-floor activation and podium treatment, and one view showing the upper floors and crown in context. Camera height is usually set at 1.5–3 stories off grade — human eye level or slightly elevated — with a telephoto lens setting to reduce perspective distortion and show the tower at near-true proportions.
Worm's-eye view (1 image, optional). A low-angle camera looking up at the tower accentuates height and verticality. This view is most useful for pure marketing imagery where dramatic impact is the goal. It's less common in planning submissions, where accurate massing representation is prioritized over visual drama.
Photomontage composites (2–4 images, required for LA planning). The 3D model composited onto actual photographs of the site context, showing how the building will appear from specific viewpoints designated in the planning requirement. See the section below on photomontage requirements.
Upper-floor interior renders (2–4 images). Residential or hotel interiors showing the city view from upper floors — what buyers are actually purchasing at a premium. These need to be visually compelling and accurately represent the view from the specific floor and orientation specified.
Lobby and amenity renders (2–3 images). Ground-floor lobby, sky lounge, pool deck, or other amenity spaces that communicate the quality of the residential or hospitality experience.
Photomontage Requirements for LA Planning Submissions
For mid-rise and high-rise applications in the City of Los Angeles, the planning department typically requires photomontage composites as part of environmental review and design review submissions. A photomontage is a composite image that overlays the 3D-rendered building onto an actual photograph of the existing site taken from a specific viewpoint, producing an accurate representation of what the development will look like from that location.
The Los Angeles Department of City Planning specifies viewpoints for photomontage analysis as part of the environmental review process for projects subject to CEQA review. These viewpoints are typically selected to assess visual impact on designated view corridors, skyline visibility, and public open spaces. Projects near the Hollywood Hills, beach communities, and historic neighborhoods are most likely to face detailed photomontage requirements.
Photomontage production involves several steps beyond standard rendering: site photography at the exact specified viewpoints under controlled conditions, matching the 3D camera to the photographic lens and perspective, accurate scale calibration using measured site features, and compositing the rendered building into the photograph with correct lighting, shadow, and atmospheric conditions. This process typically adds 3–5 business days per photomontage view beyond the standard rendering timeline and carries a cost premium of $800–1,500 per composite view depending on complexity.
Camera and Perspective Techniques for Tall Buildings
Three camera techniques are used consistently in professional high-rise rendering to manage perspective and communicate the building's scale effectively.
Two-point perspective (vertical parallels kept true, no vertical convergence) is the standard approach for hero facade views. It makes the building look upright and proportional rather than leaning away from the camera, which is what happens with real wide-angle photography at close range. Most planning departments prefer two-point perspective for facades because it most accurately represents the building's true form.
Three-point perspective (all three axes converge) is used for dramatic elevated views and worm's-eye shots where showing the building's full height with visual impact is the goal. This is the more naturalistic camera mode — it matches what a human eye sees looking up at a tall building — but it produces more visual distortion, which is why it's reserved for marketing rather than planning imagery.
Telephoto compression involves setting a long focal length (85–135mm equivalent in 3D camera settings) and moving the camera back far enough to frame the building. This reduces perspective distortion, makes the building appear more proportional and imposing, and compresses the relationship between the building and its background — emphasizing urban density and context. Most investor and marketing renders for towers use this technique for the primary hero views.
Interior Rendering for High-Rise Units
The view from upper floors is the defining amenity of a high-rise residential or hotel project. Interior renders for tower units need to be planned in coordination with the building orientation and unit layout to show the view that buyers or guests will actually experience from each unit type.
For a south-facing unit on floor 35 of an LA tower, the interior render should show correct daylight at the right time of day, the actual skyline or mountain view from that orientation, and the unit interior at the quality level the finish schedule specifies. Renders that use a generic city backdrop rather than the actual view from the project's location are immediately recognizable and undermine buyer confidence.
For pre-sales and condo marketing, high-rise interior renders often include a "view suite" — a set of 4–6 unit renders covering the premium floor-plan types (penthouse, corner unit, standard one-bed, two-bed) from their best orientation. This gives the sales team imagery for every buyer conversation. For context on interior rendering production in general, see our guide to interior 3D rendering services.
Typical High-Rise Rendering Package and Pricing
Pricing for high-rise visualization reflects the greater complexity, larger 3D models, extended rendering times, and photomontage requirements. The table below shows indicative pricing ranges for the most common deliverable types.
| Deliverable | Timeline | Price Range |
|---|---|---|
| Exterior hero render (facade) | 5–8 days | $900–$1,800 |
| Aerial context render | 5–8 days | $1,200–$2,200 |
| Photomontage composite view | 7–12 days | $1,500–$3,000 |
| Upper-floor interior render | 5–8 days | $800–$1,600 |
| Lobby / amenity render | 5–8 days | $800–$1,500 |
| Full investor + planning package (8–12 images) | 4–6 weeks | $12,000–$24,000 |
Packages that are briefed together — rather than ordered piecemeal — are significantly more cost-efficient because the 3D model and urban context built for exterior and aerial renders is reused for photomontage composites, with no rebuild required. See our pricing page for current rates and package options.
What to Provide to Brief a High-Rise Project
High-rise visualization requires more detailed input than most project types because of the building's complexity and the accuracy required for photomontage work. A complete brief should include:
- All facade elevations (all four sides) with accurate window sizing, balcony placement, and cladding system documentation
- Typical floor plans and podium plans
- Material and cladding specifications — glass type and reflectivity, panel material, spandrel treatment
- Site plan with surrounding building heights where known
- Photomontage viewpoint specifications if required by planning — coordinates, elevation, camera height, lens specification
- Unit interior finish schedule for interior renders, with specific floor levels to be shown
- Reference imagery for design intent, material quality, and atmosphere
For planning submissions, the photomontage viewpoints are typically specified in the scoping letter from the planning department or in the CEQA notice of preparation. Providing these coordinates at the start of the brief saves a revision cycle later. Our article on 3D rendering for permit and planning applications has more detail on California-specific submission requirements.
Our exterior rendering and aerial rendering services both cover high-rise projects. For tall building visualization in the Los Angeles market specifically — including downtown, Hollywood, Koreatown, and beach communities — see our overview of 3D rendering in Los Angeles.
Planning a Tower Development?
Send us your drawings and planning brief — we'll scope a full visualization package covering investor, planning, and pre-sales deliverables with pricing within 2 hours.
Request a Free Estimate